

Materials:
Piccolo Embossing Powder in Real Rust
Piccolo Embossing Powder in Temple Stone
Piccolo Embossing Powder in Brownstone
Piccolo Embossing Powder in Mermaid Tears
Crafting Heat Gun
Piccolo Embossing Powder in Micro Black
Piccolo Embossing Powder in Cranberry Wine
Piccolo Embossing Powder in Girls' Night Out
Piccolo Embossing Powder in Siam Silver
Piccolo Embossing Powder in Vintage Silver
Piccolo Enamel/Embossing Powder Adhesive
Piccolo Easy Grip Tweezers
Dreamweaver Stencil LG 611 Stone Wall
Dreamweaver Stencil LL 394 Feathers
Dreamweaver Double Stick Mounting Paper
Handmade Hawaiian Soap (from Dreamweaver) or some other natural, soft, bar soap
Large Stencil Brush
Small Paint Brush
Paper House Papers from the Country Stack
Scotch Adhesive Tape
Art Glitter Designer Dries Clear Adhesive
Die Cut Cardstock Letters (I used the old Quickutz Chandelier Letters)
Non Stick Craft Sheet
Directions:
1) Rub the bar of soap on the back of the Stone Wall stencil. It will create a cloudy sheen over the metal, as seen in the picture below.


4) Place the metal on the exposed adhesive surface SOAP SIDE DOWN.
5) Pour the embossing powder over the sections that you would like to be that color. You do not need to use a lot. I used Real Rust, Temple Stone, Mermaid Tear, and Brownstone.


6) Press lightly with your fingers and blend powders into any areas that need additional coverage.


7) Flip the project over and carefully peel the adhesive paper off of the stencil. Be sure to leave the stencil flat on a hard surface as you remove the paper.

8) Use heat gun to emboss the powders.
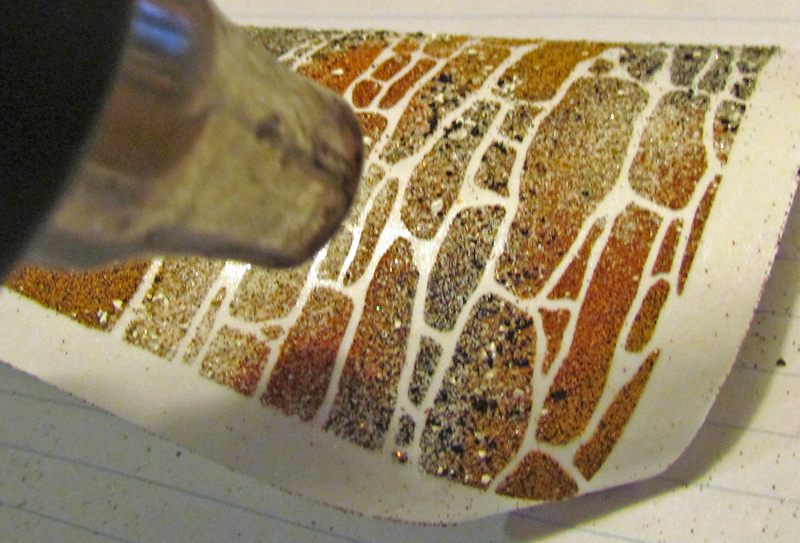

9) After the embossing powder cools, pour Micro Black over the project and rub in with your finger.


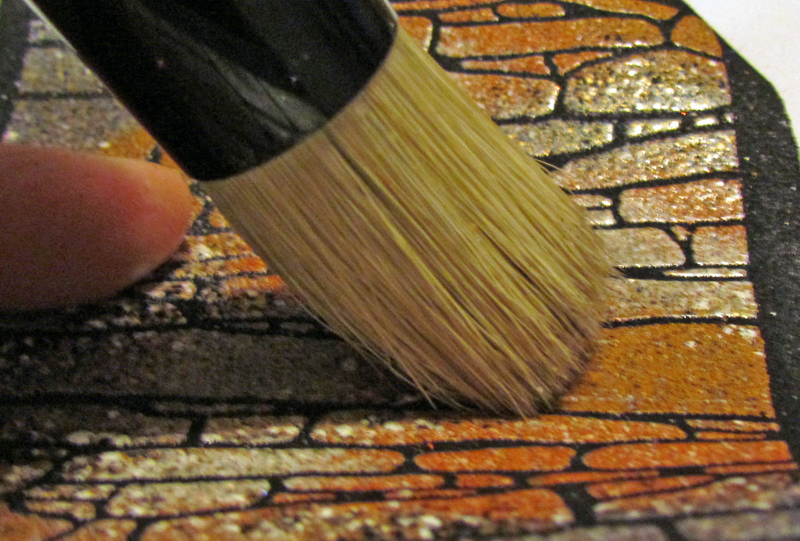
10) Use the stencil brush to brush off any excess powder. This is also a great way to distress the black a little if you brush aggressively.
11) Heat set.

12) Repeat steps 1-11, as you will need two to create a frame.
13) The technique for the feathers is almost identical to steps on through 11. The powders used are Siam Silver, Cranberry Wine (on the edges of the feathers) Girls' Night Out and Micro Black. The pinks are placed into position by using the outer one (light pink) first and pushing into place.

14) Before adding the Miro Black, be sure to trim off most of the extra (rough cut) with scissors. This will save you some of the powders.


15) Heat set and trim closer to the image.

16) For the letters, simply apply the Embossing Adhesive directly with the dauber on the bottle.

17) Cover with the Vintage Silver Embossing Enamel.

18) Heat set on craft sheet. Use the tweezers to hold the card stock steady as you heat.

18) Repeat steps 15-17, so that you have two layers of embossing powder.
19) To apply the letters, use Designer Dries Clear Glue.

20) Create the silver edge by using a paint brush to apply the Embossing/Enamel Adhesive, cover with silver and heat set.
21) To create the frame, first cut the size you want the frame to be and adhere the picture inside.
22) Cutting around the "stones" whenever possible, cut the images to fit your photograph. Save the extra to use around the page.
23) Remove the backing paper and adhere to the photo and mat.
24) Trim around the outside of the frame, making a "rocky" edge if possible.

Here is another look at the finished product.
 That about covers it! Thanks for checking out my post. If you want to come visit me, my blog is www.rememberlifesmoments.com. I would love to see you there!
8 comments:
What a delicious technique! Great tutorial. I love the look you got with the embossing powders with the stencil.
Ooh, what a beautiful technique! Love, love, love!
Wow. Laura, I am always impressed, but you have definitely outdone yourself this time. Wow. Wow. Wow!
Yes, you have definitely outdone yourself! I love this layout. Awesome!!
I just love the stonework stencil technique with the embossing powders! Beautiful work! :)
Gorgeous!! The stonewall stencil is now on my wish list!
Very Cool Laura!!!
just simply amazing! This is soo well done!
Post a Comment